Observation and Analysis of Printer Print Quality and Components
Printers and MFPs achieve stable printing only when their numerous complex components are accurately assembled. There are needs for highly accurate observation, analysis and evaluation of paper quality, ink penetration, and toner adhesion.
This section introduces the latest examples of using the VHX Series, KEYENCE's latest 4K Digital Microscope.

- Quality and R&D of Printers, MFPs, and Related Products
- Issues in Observation, Analysis, and Evaluation in the R&D of Printers and Related Products
- Latest Examples of Observation, Analysis, Measurement, and Evaluation of Printer Components, Consumables, and Print Quality
- The Latest Solution for More Efficient Printer, MFP, and Related Product R&D
Quality and R&D of Printers, MFPs, and Related Products
Printers come in various types, and the current mainstream formats are inkjet printers and laser printers. Thermal printers are commonly used for issuing receipts and forms, in copies, and in barcode printing at logistics sites.
Against the backdrop of the sophistication of printer and MFP functions, increased space saving, and a demand for faster, higher-definition, and more reliable printing, there is a growing demand for high-quality components, paper, ink, and toner.
Testing and research on a wide variety of component parts, inks, toners, photosensitive materials, and printer papers are frequently performed in order to achieve higher quality printing. On the other hand, from the perspectives of product R&D, quality assurance, and quality control, higher accuracy is in demand for the observation, analysis, measurement, and evaluation of samples using microscopes and other instruments.
Issues in Observation, Analysis, and Evaluation in the R&D of Printers and Related Products
What is particularly important in the research and development of printers is to quickly derive accurate evaluations. Delays and inaccuracies in evaluation are big setbacks in the R&D race to swiftly turn out excellent products. For example, conventional microscopes have the following problems with observation, analysis, and evaluation related to printing:
- Alignment and focusing are difficult at higher magnifications. Only part of the target can be brought into focus at a time if the surface is uneven, which makes observation time-consuming.
- Details cannot be captured in magnified observation of faint-coloured printer paper and toner due to insufficient resolution.
- A separate tester is necessary for 2D or 3D measurement, thereby increasing the number of inspection tasks and engineering hours.
The next section introduces application examples of KEYENCE’s latest 4K Digital Microscope, which solves the conventional problems of microscopes and enables clear observation and higher-accuracy analysis, measurement, and evaluation.
Latest Examples of Observation, Analysis, Measurement, and Evaluation of Printer Components, Consumables, and Print Quality
KEYENCE has continuously improved and refined next-generation digital microscopes for over 20 years through feedback and input from our customers. The VHX Series high-definition 4K Digital Microscope is KEYENCE’s latest development using an advanced optical system, image processing techniques, and a proprietary design system. The VHX Series supports high-magnification 4K imaging, 2D and 3D measurements, and automatic area measurement in a single device.
This section introduces examples of the application of the VHX Series in the printer industry.
Examples with media (different types of printing paper)
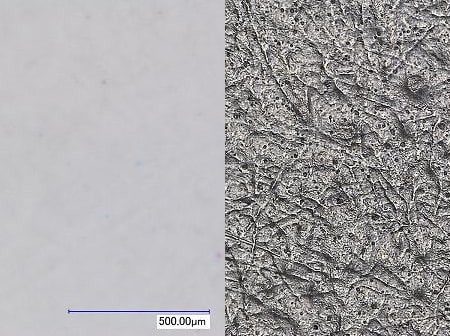
Observation of inkjet paper and other printing papers
Conventional microscopes cannot capture the fine details on the surface of paper, and scanning electron microscopes (SEMs) require time-consuming sample preparation before observation can be performed.
The VHX Series 4K Digital Microscope can easily capture high-definition 4K images, which enables quick, clear observation of fine details and fibre conditions on the paper’s surface.


Quantitative evaluation of label paper based on defect analysis and 3D shape measurement
The VHX Series 4K Digital Microscope achieves high-accuracy 3D shape measurement using high-resolution magnified images. In addition to displaying the profile height of the surface in colour, the new microscope can acquire measured values from 3D and profile measurements.
This solves the issue of variations between evaluations—a common problem in conventional defect analysis—and makes quantitative evaluation possible. Furthermore, all of the steps in the inspection process, from observation to analysis and measurement to report creation using images and measured values, can be done with just one VHX Series unit without passing on tasks to other measurement systems during the process.


- A. Analysis of defective sample (300x)
- B. 3D shape measurement of defective sample
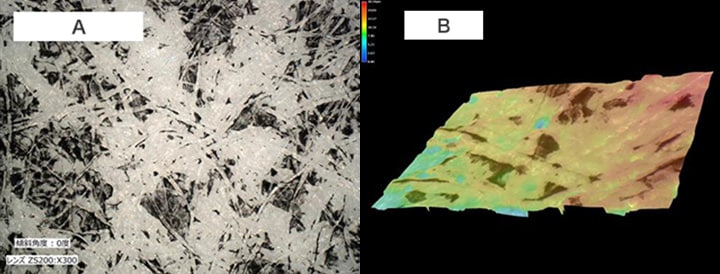
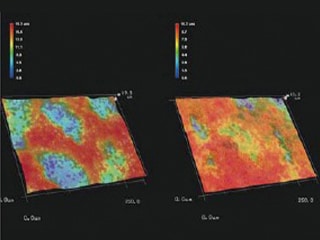
- A. Analysis of reproduced sample (300x)
- B. 3D shape measurement of reproduced sample

- A. Analysis of faded sample (300x)
- B. 3D shape measurement of faded sample
Examples with laser printers
High-magnification observation of toner adhesion
The high-resolution HR lens and motorised revolver of the VHX Series 4K Digital Microscope together enable a seamless zoom function that automatically switches between lenses from 20x to 6000x magnification. This function eliminates the time and effort that were required to replace lenses and enables magnified observation with intuitive operations.
Due to the limitations of the depth of field of conventional microscopes, only a part of the target can be brought into focus at a time in the high-magnification observation of printing paper, which has a three-dimensional fibre structure.
The VHX Series features a depth of field 20 times that of conventional microscopes and a real-time depth composition function, both of which provide fully focused images that clearly capture the paper structure and toner adhesion state. Users can experience quick and accurate observation and analysis.


Quantitative evaluation of toner adhesion
The VHX Series 4K Digital Microscope achieves high-resolution high-magnification observation, which can further be used for high-accuracy automatic area measurement and 3D shape measurement.
With the automatic area measurement function, users can simply specify the measurement range on the image to run an automatic, high-accuracy analysis of toner particles, even on printing paper and other such targets with uneven surfaces. The 3D shape measurement function supports smooth analysis and comparison using a colour-coded 3D image and profiling.
Additionally, by having a template ready prior to observation, users can automatically generate a report using the acquired images and measurement data.
The VHX Series can drastically shorten work time thanks to its ability to complete the entire series of required tasks with a single machine.

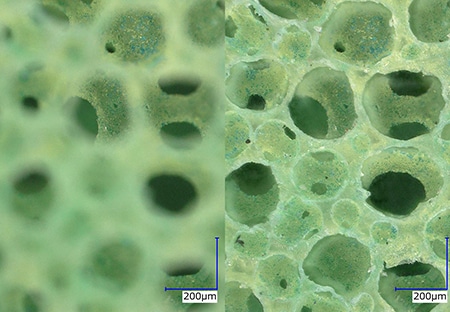
Observation of a sponge roller
Due to their limitations in the depth of field and resolution, conventional microscopes do not allow for easy observation of the textured, complex shapes of sponge rollers. The VHX Series 4K Digital Microscope features seamless zoom and real-time depth composition functions that automatically switch the magnification up to 6000x. This automatic switching of the magnification enables the observation of the details of the surface texture of the sponge roller with high-resolution, fully focused images even at high magnifications.

Examples with inkjet printers
Observation of ink penetration
Due to the insufficient quality of the sample cross-section in the high-magnification observation of ink penetration, conventional metallurgical microscopes cannot readily focus on the surface due to the slight tilt of the cross-section.
The VHX Series 4K Digital Microscope’s real-time depth composition function enables easy acquisition of clear images with the entire target in full focus, even when the cross-section is tilted.
Users can quickly and accurately observe ink penetration regardless of the sample conditions.

Ink adhesion
The VHX Series 4K Digital Microscope offers high-definition 4K images for clear observation of ink surface conditions, from which you can accurately evaluate how ink is adhering to the paper.

Examples with thermal printers
3D measurement of thermal printhead
Thermal printers come in two types: a thermal transfer type, which heats and transfers the ink applied to the tape (ribbon) onto paper, and a direct thermal type, where a thermal-sensitive paper that turns colour with heat comes into contact with the heater element. For both types, the quality of the thermal printhead greatly affects the clear printing of text and barcodes. Particularly in the case of terminals with barcode printing functions, compact thermal printheads need highly accurate inspections.
The VHX Series 4K Digital Microscope uses high-resolution 4K images for quick, highly accurate 3D shape measurement or profile measurement of the specified area. A single VHX Series unit supports both quick wear observation and quantitative evaluation.

Quality assurance and control of printer parts
Observation of wear on a timing belt
The deep depth of field of the VHX Series 4K Digital Microscope captures high-definition images in full focus, even for three-dimensional parts such as timing belts.

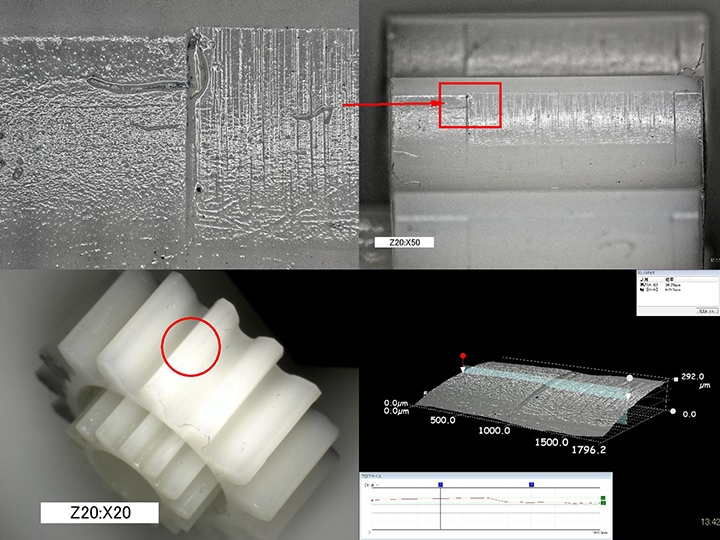
Contact surface observation and 3D measurement of plastic gears
Printers can only provide stable operation and print quality when their numerous components are functioning correctly. To that effect, a high level of accuracy is required for the dimensions, profile, and assembly of parts such as small plastic gears and casings.
While minute exterior problems on plastic parts tend to have low contrast that makes them difficult to observe with conventional microscopes, the VHX Series 4K Digital Microscope can clearly capture contact indentations caused by dimensional or assembly errors.
The observation images can be directly used for 3D measurement and profile measurement, thereby contributing to accurate evaluation based on numeric data.
Observation of microcracks in printer parts
With the VHX Series 4K Digital Microscope, you can clearly observe microcracks that cannot be captured by conventional microscopes due to insufficient resolution.

The Latest Solution for More Efficient Printer, MFP, and Related Product R&D
Components and other products related to printers and MFPs come in a great variety, and manufacturers must respond to the need for observation, analysis, and evaluation of varied targets.
In addition to the functions introduced here, the VHX Series 4K Digital Microscope is equipped with many more useful functions for research and development, including glare removal for glossy targets, free-angle tilt observation, and automatic reporting.
For additional product info or inquiries, click the buttons below.


